Patio Project
Trish and I have been considering installing a patio out in the yard for some time but we don't have any experience with a project like this. So to get our feet wet, I thought we could do a little practice run on the side yard, a relatively small area between the deck, the house and the shed. Now, experienced landscapers are already snickering at the two red flags in the last sentence, namly the phrases "little practice run" and "relatively small". But more on that soon enough.
To prepare the area, we wanted to mow the grass down as low as possible. Since it needed it, I mowed the whole lawn first and then moved over to the patio area to lower the lawnmower. The adjustments are relatively simple, a hand lever at each wheel allows you to make changes. The first went down very easily. But the second was a bit more stubborn and the mower moved a bit. In an effort to steady it I moved a bit closer to get a better angle and put my hand on the mower to steady it. The problem was that I didn't put my hand on the mower, I'd put it on the hot exhaust muffler, resulting in a painful series of burns across my left fingertips, pictured below, left. Click on the picture for a larger version.

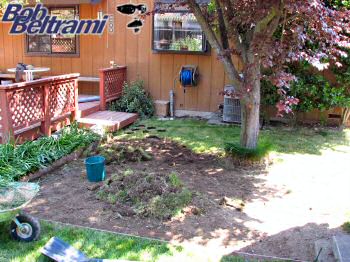
After my hand spent some time immersed in cold water, we wrapped it up, put it in a glove and got on with the mowing. With the grass cut low we strung a line along the flowerbeds across to the shed. This would serve as the base line for the patio and everything would square off of it. I grabbed the cutter mattock and went to work clearing sod and topsoil.
It was at this point that I realized that the dimensions of the patio had grown. The width had increased by almost four feet (to cover the path to the shed) and the length was increased nearly to the fenceline (to match the path on the side of the house) along with the addition of a path to the side door. Suddenly the relatively small project had gone from a 100 sq ft practice run to a 350 sq ft monster.
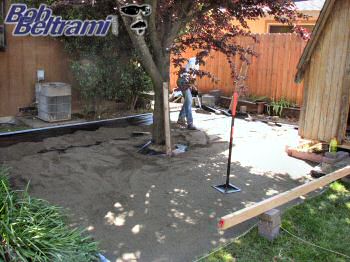
With the sod out of the way we spent significant time identifying high spots with a 2x4 and leveling them off. The area wasn't as level as we would have wished for and the soil has a lot of river rock mixed in. Leveling was pretty frustrating, as you want to shave the soil off the top without any digging. This leaves the soil compacted and firm. But the river rock made this very difficult. In a perfect world, we would have removed another three to four inches of topsoil, but between the rock and the roots from the tree, that option wasn't very appealing. At the end of two days, the area was cleared and roughly level enough to move on to the next step.
We purchased landscaping fabric at the hardware store and began spreading it out, careful to overlap the sections for complete coverage. The fabric is very lightweight, but strong, allowing air and moisture to pass through, yet providing a very effective barrrier against weeds.
Next we made a quick run to the local aggregate supplier and returned with a truck full of concrete sand that we spread across the entire area. Two more truckloads later (and what seemed like 100 wheelbarrow trips to the back yard) we had enough sand to level the patio. After getting the sand spread out, it needed tamping down. First by foot, then with a tamper, we slowly began forming a stable, flat foundation for the pavers. Using a 2"x4" as a screed we worked from the corner all the way across, leveling the surface. When we got to the edges, we temporarily installed a scallopped brick border.

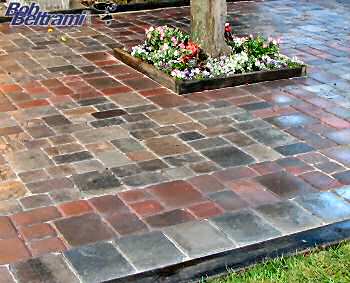
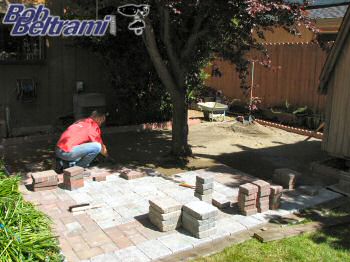
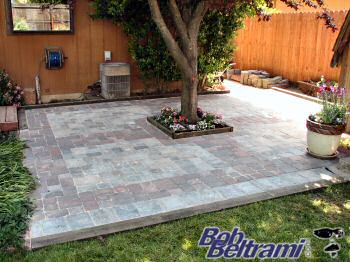
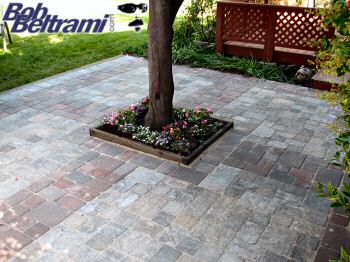
Finally time to begin laying pavers, we started at the grass line and worked along the flowerbed along the deck and out toward the tree. Along the grass, we placed a row of grey 8"x11" pavers as a boundary, then started the pattern for the patio itself. The edge is made of red pavers that also cross straight to the tree and then form the inner edge of the tree's flower box. The remaining areas are filled by a colored cobblestone paver. It took a bit of time to find the right patterns to achieve the right look. But once we got in the rhythm the installation went smoothly.
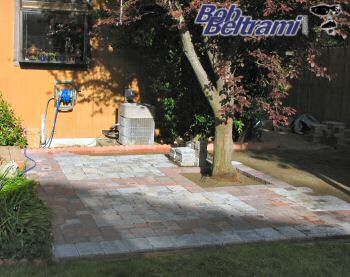

When we got to the edge, we realized that we didn't like the scalloped brick and decided to replace it with pressure treated 4x6's, secured with two-foot sections of half-inch rebar. While heavy to work with, the 4x6's look is much more desireable and we're pleased with the result. Pounding in the rebar was tough, but once finished the timbers are very secure.
The final touches included installing 2x6s in the center bed as an edging and then spreading a fine grit blonde beach sand across the top and sweeping it into the cracks between the pavers.
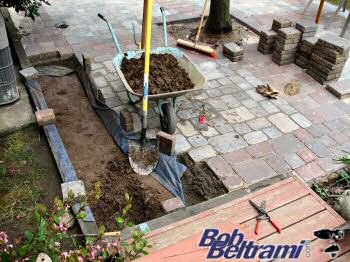
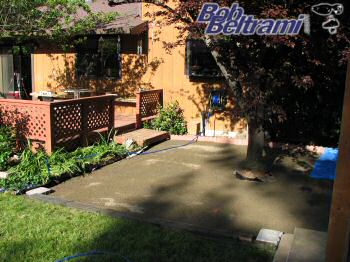
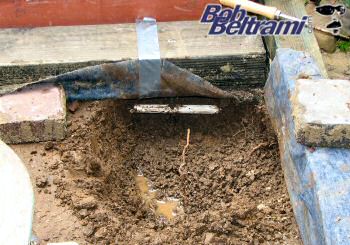
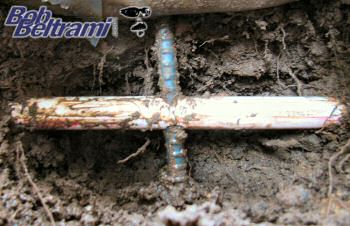
We thought we were through and christened the new patio with margaritas and bbq. But when we awoke the next morning, we found that there was one little problem. It seems that when I put in the 4x6 at the deck edge, I pounded the rebar right smack dead center through one of the sprinkler / irrigation lines. Before we knew it, there was water and sand washing everywhere and the pavers were floating on the landscaping fabric like a waterbed. After turning off the water and taking a few moments to work my way through Ross' Five Stages of Grief, I started removing sandy wet bricks and the layer of concrete sand, cut through the landscaping fabric and began digging in search of the leak. Thankfully my little act as a PVC Van Helsing only cost the better part of a day. After identifying the break, I dug out the pipe and repaired the line. Without question, the most difficult part was returning the sand and bricks to a level to match the rest of the patio.
Below are shots of the finished product after Trish did some planting and we setup the irrigation.
- Time: Three weekends (approx. 75 hrs)
- Square Footage: 350
- Material Cost: $1783.00
- Tools:
- Mason's Line
- Line Level
- Cutter Mattock
- Nursery Spade
- Round-point Shovel
- Square-point Shovel
- Hoe
- Rake
- Wheelbarrow
- Tamper
- Screed
- Level
- Hammer
- Masonry Chisel
- Circular Saw
- Reciprocating Saw
- Rubber Mallet
- 10# Sledge Hammer
- Stiff-bristle Broom
- Materials:
- Landscaping Fabric (350'x3')
- Concrete Sand (1.75 ton)
- Grey Pavers, 8x11 (16)
- Red Pavers, 5x5 (153)
- Red Pavers, 5x8 (176)
- Red Pavers, 8x11 (66)
- Cottage Pavers, 5x5 (208)
- Cottage Pavers, 5x8 (272)
- Cottage Pavers, 8x11 (67)
- Pressure-treated 4x6's (88')
- Pressure-treated 2x6's (16')
- Rebar, 1/2" (60')
- Sand, Granular Beach (300#)